LODs in Blender: Create Game-Ready Level of Detail Sets
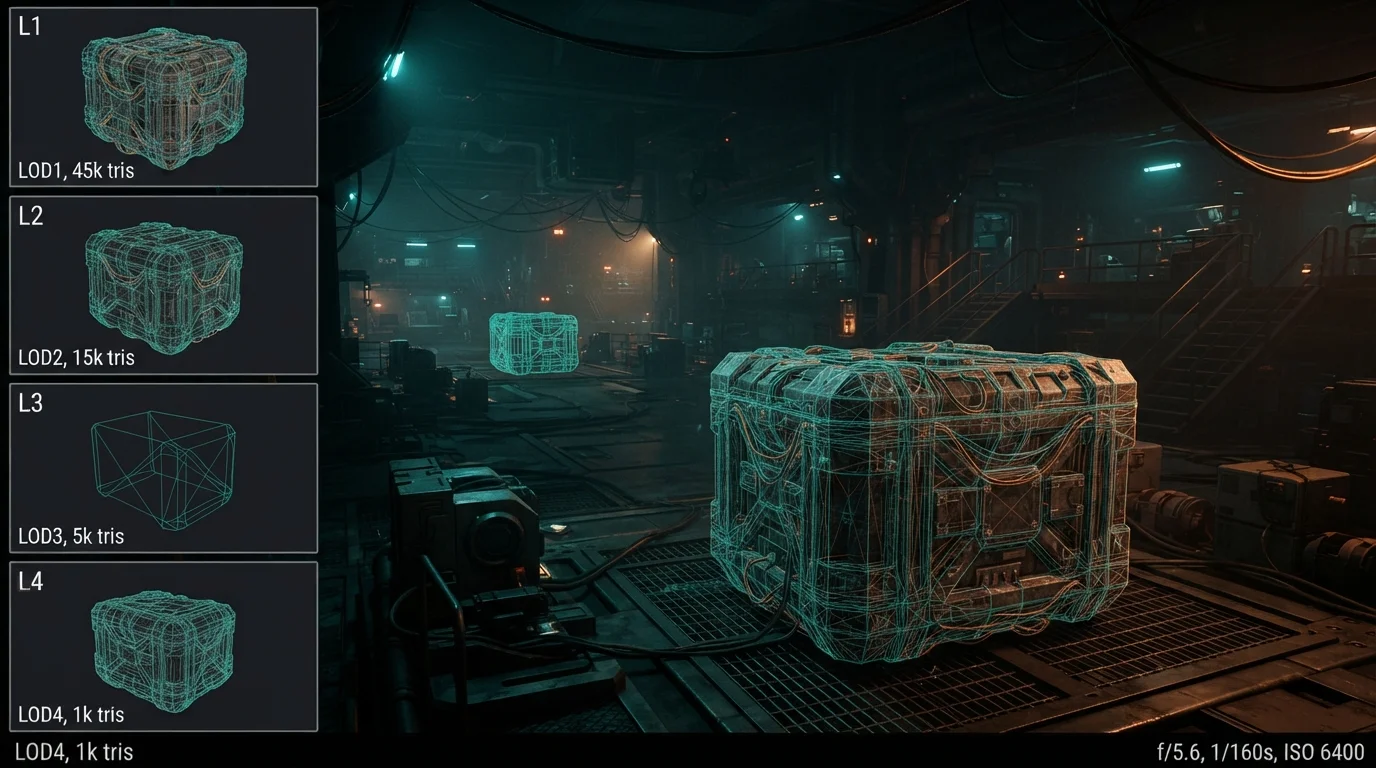
LOD in Blender is the workflow that stops a game scene from stuttering when the camera swings around. A level of detail set is a family of meshes for the same asset, each with a lower triangle count, and the engine swaps between them as the object moves away or shrinks on screen. Done right, you cut the total polygon budget without visible quality loss, and the scene keeps a stable frame rate even with dozens of props on screen.
Why LODs Matter: The Polygon Budget Behind Stuttering Scenes
Every prop you drop into a scene renders at full detail no matter the distance unless you tell it otherwise. A LOD set fixes that: you ship the dense mesh, plus progressively lighter versions. The engine picks the version based on how much screen space the object occupies. Close up, it draws the detailed mesh; far away, it draws the cheap one. The player rarely notices, but the renderer does far less work.
Distance and screen size: how the engine picks which LOD to draw
Engines do not switch LODs by raw distance alone. They use the projected screen size of the object: a huge rock far away can still take more screen space than a small crate right in front of you. Both Unity and Unreal expose thresholds for when each LOD kicks in. The important part happens earlier, though: the LOD meshes have to exist and be named correctly before the engine can use them.
LOD in Blender: The Game-Ready Workflow
Creating LODs in Blender takes minutes per asset once the workflow is muscle memory. The core loop is validate, duplicate, decimate, and export. Start with a mid-poly prop such as a sci-fi crate or a rock so the wireframe comparison between levels reads clearly.
Step 1: Validate the LOD0 mesh before you touch anything
Your full-detail mesh is the reference for every lighter version, so fix it first. Apply the scale with Ctrl+A, set the origin to geometry, and check that normals point the right way. A broken LOD0 propagates problems to every level below it.
Step 2: Duplicate the mesh once per LOD level
Duplicate the object for each level you plan to create. Three levels plus the original is the standard setup: LOD0, LOD1, LOD2. Keep the copies with identical transforms so the pivots stay aligned; a misaligned pivot is a common cause of popping in-engine.
Step 3: Decimate with a budget per level (50%, 25%, 10%)
Apply the Decimate modifier to each duplicate with a clear triangle budget. The typical breakdown is LOD1 at around 50% of the LOD0 count, LOD2 at 25%, and LOD3 at 10%. After each level, switch to wireframe and confirm the silhouette still reads correctly; losing a defining edge reads as a quality drop.
The Decimate Modifier: Three Modes, Three Use Cases
The Decimate modifier is the tool behind most LOD in Blender work, and it has three modes because no single algorithm fits every mesh.
Collapse: the workhorse for organic and complex meshes
Collapse merges vertices progressively while respecting the overall shape. The Ratio value is the fraction of faces to keep: 1.0 leaves the mesh unchanged, 0.5 halves the faces, and 0.0 removes everything. One catch: the ratio is calculated on triangles. If your mesh still has quads and Triangulate is off, you can end up with more faces than the ratio suggests, because quads survive unless their edges collapse. Enable Triangulate for predictable results, and use Symmetry to keep both sides even.
Un-Subdivide: the reverse-subdivide trick for grid topology
If your asset was built with grid-based topology, Un-Subdivide removes the edges a subdivide operation created, giving a cleaner reduction than collapse. Iterations work in pairs: two iterations equal one subdivide level, so always use even numbers.
Planar: dissolving flat surfaces on hard-surface assets
Planar collapses mostly flat surfaces, which makes it ideal for hard-surface props. The Angle Limit dissolves geometry whose face angles stay under the setting, and Delimit stops the dissolve at Normal, Material, Seam, Sharp, or UV borders so you keep the important edges. Use All Boundaries when you push the Angle Limit high.
Vertex groups: protecting the parts you cannot afford to lose
Sometimes a section of the mesh must keep its density, like the rim of a barrel or the handle of a tool. Paint a vertex group over those areas, then set it in the Decimate modifier with a low Factor; decimation will avoid that region while simplifying the rest.
Keeping UVs, Normals and Materials Intact
Decimation changes geometry, and geometry changes affect your textures. The two things that break most often are UVs and normals.
Why decimation stretches textures (and how to prevent it)
When vertices collapse, the UV islands attached to them can stretch or shift, producing smeared textures. Check the UV editor after each decimate pass, especially around seams. Using Collapse with Triangulate keeps the triangulation stable, which makes UV and normal behavior predictable.
Triangulate, shade smooth and the face orientation check
Before exporting, triangulate the mesh, apply shade smooth, and run the Face Orientation overlay from the Viewport Overlays menu. Flipped faces appear red in that overlay; select them and recalculate normals with Shift+N. Keep Auto Smooth at 180 so hard edges survive.
One material slot across all LODs
Every LOD level should share the same material slots as LOD0, with the same order. Mismatched slots make the mesh look different after a swap, and some engines refuse to render the level at all.
Naming and Exporting LODs for Your Engine
The names you give your LODs decide whether the engine wires them automatically.
Unity: the _LOD0 naming convention and the automatic LOD Group
Unity expects a specific naming convention: create the LOD meshes in your external app and name them ExampleMeshName_LOD0 for the most detailed version, then ExampleMeshName_LOD1 and ExampleMeshName_LOD2. Export them together as a single FBX. On import, Unity recognizes the names and automatically creates a GameObject with an LOD Group component. No manual wiring needed.
Unreal: auto-generated LODs in the Static Mesh Editor
Unreal gives you a shortcut. Open the Static Mesh in the Static Mesh Editor, expand LOD Settings, pick an LOD Group such as SmallProp, and the engine auto-generates the levels. The Screen Size per LOD setting controls the switch distance.
FBX export settings that keep LODs aligned
Export Selected Objects only, enable Apply Transform, set Forward to -Z and Up to Y, and enable Apply Modifiers so the decimation is baked into the exported mesh. Disable Add Leaf Bones when there is no armature. These settings keep every LOD aligned to the same pivot, preventing offset and popping in-engine.
Automating the Pipeline with a Python Script
Once the workflow feels natural, script it. A short bpy script duplicates the LOD0 object, adds a DECIMATE modifier at the target ratio, and applies it. The key detail is use_collapse_triangulate = True, which enforces triangulated output and keeps UV and normal behavior predictable:
import bpy

obj = bpy.context.active_object
levels = [(0.5, "_LOD1"), (0.25, "_LOD2"), (0.1, "_LOD3")]

for ratio, suffix in levels:
    new_obj = obj.copy()
    new_obj.data = obj.data.copy()
    new_obj.name = obj.name + suffix
    bpy.context.collection.objects.link(new_obj)
    dec = new_obj.modifiers.new("Decimate", "DECIMATE")
    dec.ratio = ratio
    dec.use_collapse_triangulate = True
    bpy.ops.object.modifier_apply({"object": new_obj}, modifier="Decimate")
Run it, rename the outputs, and you have a full set in seconds. For batch jobs over many assets, addons like LODGen, SwiftLOD, or LOD-Architect-Lite automate the whole loop and export straight to Unity or Unreal.
Common LOD Mistakes and How to Avoid Them
The same mistakes show up in almost every pipeline. Misaligned pivots between levels cause popping and offset in-engine, so set Origin to Geometry and keep identical transforms on every LOD. Stretched UVs and seams after decimation are the second classic, fixed with a UV check per level. Flipped or black faces get caught by the Face Orientation overlay and Shift+N. Mismatched material slots across LODs break the swap, and ratios that are too aggressive destroy the silhouette. For collision, duplicate LOD0, decimate to a 0.1 to 0.2 ratio or use Limited Dissolve, delete internal faces, and wire it as a Unity Mesh Collider or Unreal custom collision.
Checklist: From One Mesh to a Full LOD Set
Run this list on every asset before it leaves your scene. Validate LOD0 with applied scale and origin to geometry. Duplicate once per level with identical transforms. Decimate at 50%, 25%, and 10% using the right mode for the topology. Check wireframe silhouettes at every level. Verify UVs, normals, and material slots. Name the meshes with the _LOD0, _LOD1, _LOD2 convention. Export with Apply Modifiers, -Z Forward, and Y Up. Import and confirm the LOD Group was created.
That is the whole pipeline. If this feels like busywork you would rather skip, the game-ready models in the QuickPoly catalog already ship with LOD sets generated and engine-named, ready to drop into Unity or Unreal.